How to Open the Bonnet on a Citroen Relay Van
How to Open the Bonnet on a Citroen Relay Van: Step-by-Step
Opening the bonnet on a Citroen Relay is a straightforward two-stage process, but if you've never done it before — or you've just picked up a used Relay and the previous owner didn't leave a handbook — it can feel a little awkward the first time. Like most large panel vans, the Relay uses an interior release lever followed by an external safety catch, which is a deliberate design to stop the bonnet flying up at motorway speeds. Follow the three steps below and you'll have full access to the engine bay in under a minute.
Step 1: Locate the Interior Bonnet Release
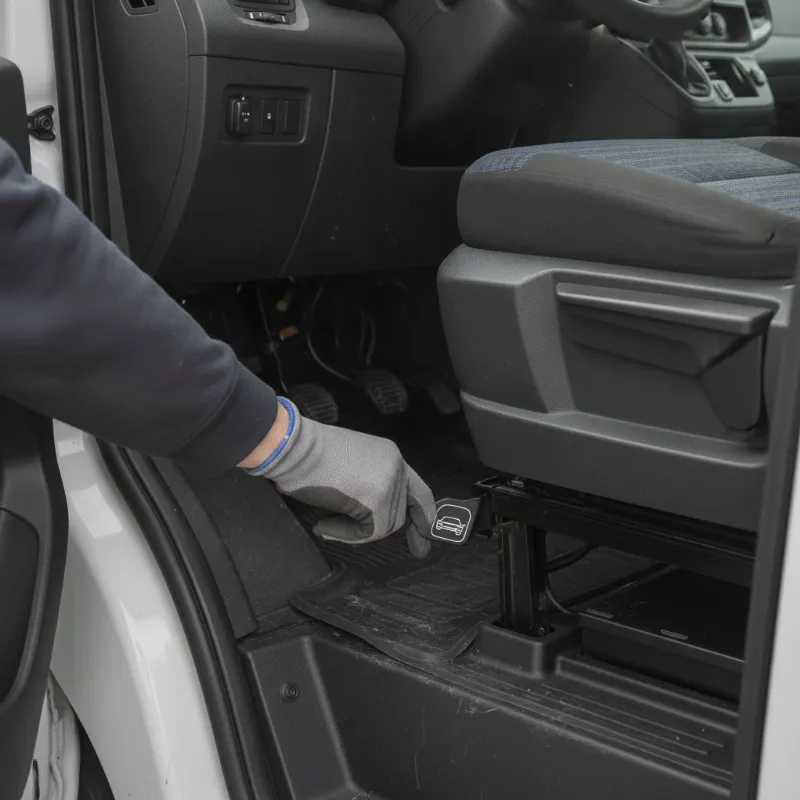
Sit in the driver's seat and look down into the footwell, towards the lower left-hand side of the dashboard near the door pillar. You're searching for a small plastic lever, usually black, sometimes marked with a bonnet icon. Pull it firmly towards you until you hear a distinct "clunk" from the front of the van — that's the primary latch releasing. On older Relays the cable can feel stiff, so don't be afraid to give it a proper tug. You should see the leading edge of the bonnet lift very slightly, no more than a centimetre or two, once the catch has popped.
Step 2: Release the External Safety Catch
Walk around to the front of the van. The bonnet will be sitting proud of the grille but still held shut by the secondary safety catch — a small metal lever tucked underneath the front lip of the bonnet, roughly in the centre. Slide your fingers into the gap and feel for the catch. On the Relay, you generally need to push the lever sideways (usually to the right, but check by feel) while lifting the bonnet upwards with your other hand. It's a knack rather than brute force, so if it doesn't move, wiggle the bonnet gently as you press the catch.
Step 3: Lifting and Securing the Bonnet
Once the safety catch releases, lift the bonnet fully upwards. On most Relay models there's a prop rod stowed along the inner wing or across the front slam panel — locate it, swing it upwards, and slot the end into the dedicated hole on the underside of the bonnet to hold it open. Some later Relays are fitted with gas struts that hold the bonnet up automatically, in which case you can skip the prop rod entirely. Give the bonnet a gentle push down before letting go, just to confirm the prop is seated properly and won't slip.
2004 Citroen Relay LWB Dimensions and Bonnet Access
The 2004 long-wheelbase Relay is a substantial vehicle — around 5.8 metres long depending on the exact variant, with a high roof option pushing the overall height beyond 2.5 metres. Despite the extra load length compared with the standard wheelbase, the front end of the van is unchanged, which is good news for anyone worried the bigger body might complicate access to the engine.
Why LWB Layout Doesn't Change the Bonnet Procedure
The Relay shares a common cab and front subframe across the SWB, MWB and LWB variants. All the extra length is added behind the B-pillar to accommodate the longer load area, so the bonnet, wings, grille, latches and cable routing are all identical to shorter versions. Whether you're working on a 2004 LWB panel van, a Luton conversion or a tipper based on the same chassis, the release lever sits in the same place in the footwell and the safety catch is in the same spot under the bonnet lip.
Citroen Panel Van Relay 1500 TD HDi MWB Key and Bonnet Release
The 1500 TD HDi medium-wheelbase Relay was a hugely popular workhorse thanks to its 2.0 or 2.2 HDi diesel engines and manageable footprint. Owners occasionally ask whether the key plays any role in unlocking the bonnet, since some manufacturers integrate a lockable bonnet release. On the Relay, the bonnet itself doesn't have a key-operated lock — but the ignition and cab doors still matter for safe access.
Using the Ignition Key Before Accessing the Bonnet
Before you lift the bonnet, make sure the ignition is switched off and the key removed. This is particularly important on HDi diesel models where the electric cooling fan can spin up unexpectedly after the engine has been running, even with the key removed, if coolant temperatures are high. You'll also want the cab doors unlocked so you can reach the interior release lever in the first place. Once you're happy the engine is off and cool, follow the standard three-step procedure above.
What You Can Access Under the Bonnet
With the bonnet open and propped, you've got clear sightlines to the main service items on the Relay. Weekly walk-around checks only take a couple of minutes, and staying on top of them can prevent breakdowns and expensive engine damage further down the line.
Citroen Relay Battery Location and Checks
The battery on most Relay models sits on the driver's side of the engine bay, towards the front and secured by a metal clamp bar. On some later Euro 5 and Euro 6 vans it may be tucked further back near the bulkhead, or in a few van conversions relocated entirely — but the factory position is front-left. Check the terminals for any white or green corrosion, make sure the clamp is tight, and if you have a multimeter handy, a healthy battery at rest should read somewhere in the region of 12.6 volts.
Oil, Coolant and Washer Fluid Reservoirs
The engine oil dipstick is usually marked with a bright yellow pull ring — withdraw it, wipe it clean, reinsert fully, then pull again to read the level between the min and max marks. The coolant expansion tank is a translucent plastic reservoir with min/max markings on the side; only ever check it when the engine is cold, as removing the cap on a hot system can cause serious scalding. The screenwash reservoir is typically capped in blue and takes a generous couple of litres, which is worth topping up regularly given how much road grime a working van picks up.
Common Bonnet Issues on the Citroen Relay Van
Relays are hard-working vans, and the bonnet mechanism sees plenty of use over the years. Two problems come up more often than any others.
Stuck Release Cable
If you pull the interior lever and nothing happens at the front of the van, the release cable has probably seized or stretched. This is especially common on high-mileage or older Relays that have spent winters exposed to road salt. Sometimes a helper pressing down firmly on the bonnet while you pull the lever will free it; in more stubborn cases you may need to open the grille and manually trip the latch with a long screwdriver, then replace the cable to prevent the same problem next time.
Worn Safety Catch
The secondary safety catch is a simple sprung metal lever, and after thousands of open-close cycles it can wear, bend or lose spring tension. Symptoms include a bonnet that rattles at speed, sits unevenly against the wings, or refuses to release even when you can clearly feel the lever. A replacement catch is inexpensive and usually straightforward to fit, but do check the alignment of the striker pin at the same time.
When to Book a Professional Inspection
If the bonnet won't open at all, if the safety catch has failed and the bonnet is bouncing or lifting at speed, or if you spot anything alarming under there — fresh oil leaks, coolant residue, damaged wiring, or corrosion around the battery tray — it's worth getting the van into a workshop rather than pressing on. A trained technician can also give the bonnet hinges, prop rod mounts and slam panel a proper once-over, which is particularly useful if you're buying a used Relay and want confidence in its overall condition before committing to the purchase.
FAQs
How do you open the bonnet on a Citroen Relay van?
Pull the interior bonnet release lever located in the driver's footwell near the lower left of the dashboard until you hear the latch click. Then walk to the front of the van, slide your fingers under the front lip of the bonnet, push the secondary safety catch sideways and lift the bonnet upwards. Secure it either with the prop rod slotted into the underside or, on later models, let the gas struts hold it open.
Where is the bonnet release lever on a Citroen Relay?
It's inside the cab, in the driver's footwell on the lower left of the dashboard near the door pillar. It's a small plastic lever, usually black, and often marked with a bonnet symbol. You pull it towards you until you hear the front latch pop.
Why won't my Citroen Relay bonnet open when I pull the lever?
The most common cause is a stretched or seized release cable, particularly on older or high-mileage vans. Try having a helper press down firmly on the bonnet while you pull the lever. If that doesn't work, the latch may need to be tripped manually through the grille with a long screwdriver, followed by replacement of the cable.
Do I need a key to open the bonnet on a Citroen Relay?
No, the Relay bonnet itself isn't key-operated. However, you'll need the cab doors unlocked to reach the interior release lever, and you should always switch the ignition off and remove the key before opening the bonnet, especially on HDi diesel models where the cooling fan can activate unexpectedly.
Where is the battery located under the Citroen Relay bonnet?
On most Relay models the battery sits on the driver's side of the engine bay, towards the front, held down by a metal clamp bar. Some later Euro 5 and Euro 6 vans place it further back near the bulkhead, and converted vans occasionally relocate it entirely.