How to Open the Bonnet on a Citroen Dispatch (All Models)
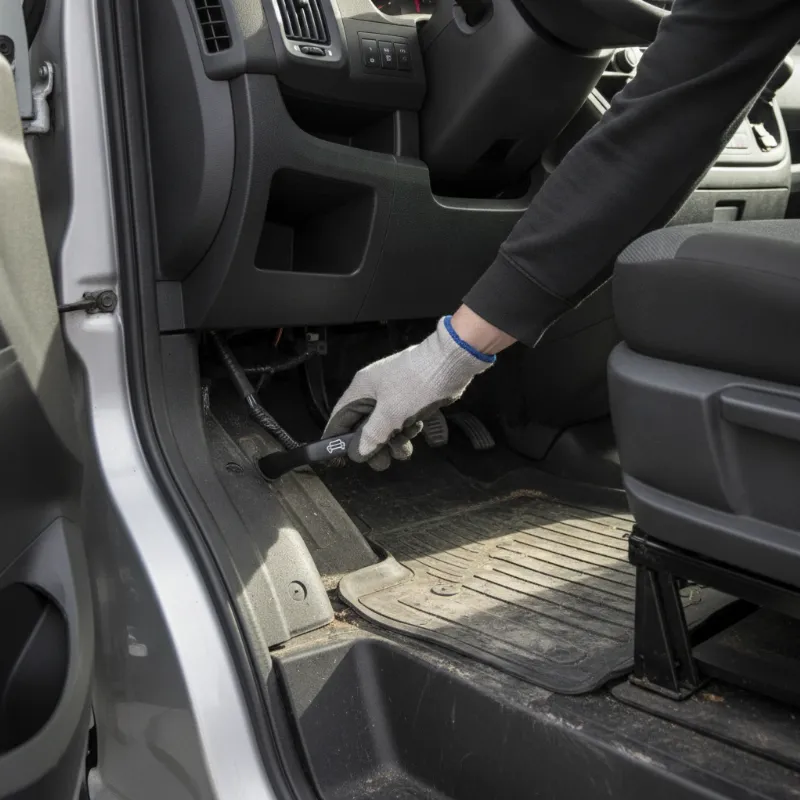
Where is the bonnet release on a Citroen Dispatch?
On every generation of the Citroen Dispatch — from the earlier Mk1 and Mk2 vans through to the current third-generation model shared with the Peugeot Expert and Vauxhall Vivaro — the primary bonnet release is located inside the cab, not under the front grille. You'll find the release lever tucked into the driver's side footwell, low down near the door sill. It's usually marked with a small bonnet icon and, depending on the model year, will either be a black plastic pull-handle or a lever finished in body-coloured trim.
The secondary safety catch, which stops the bonnet flying up at motorway speeds if the primary latch fails, sits under the leading edge of the bonnet itself, roughly in the centre above the Citroen badge. You'll need to reach in with your fingers to release it once the bonnet has popped up an inch or two. This two-stage system is standard across the Dispatch range and is designed to make sure the bonnet can't open unexpectedly while you're driving.
Step-by-step: how to open the bonnet on a Citroen Dispatch
Opening the bonnet on a Dispatch is a quick job once you know where everything is. Park on level ground, switch the engine off, and make sure the van is cool if you've just been driving — the engine bay can get very hot, particularly on the diesel variants. Then follow the three steps below.
Step 1: Pull the interior bonnet release lever
Sit in the driver's seat and look down into the footwell to the right of the pedals (or to the left on left-hand-drive imports). Reach down and pull the bonnet release lever firmly towards you. You should feel a solid click and hear the bonnet pop free of its primary latch at the front of the van. On some higher-mileage Dispatches the cable can feel a little stiff, so give it a confident pull rather than a light tug. If nothing happens on the first attempt, let the lever return fully and try again.
Step 2: Locate and release the secondary safety catch
Walk round to the front of the van. The bonnet should be sitting slightly proud of the grille — usually raised by about 20 to 30mm. Slide your fingers up under the centre of the bonnet's leading edge until you feel a small lever or tab. On most Dispatch models you push this lever sideways (typically to the left) while lifting the bonnet with your other hand. It's a knack rather than a heavy job, and once you've done it once you'll find it second nature.
Step 3: Lift the bonnet and secure the stay
With the safety catch released, lift the bonnet smoothly upwards. On the newer third-generation Dispatch there are gas struts that hold the bonnet up automatically, so you can simply raise it and let the struts take the weight. On older Mk1 and Mk2 models you'll need to locate the metal prop rod — usually clipped to the front slam panel or along one of the inner wings — and slot it into the designated hole on the underside of the bonnet. Check the stay is properly seated before letting go, and never rely on a bent or damaged prop rod.
Bonnet won't open? Common issues and fixes
The most common problem on Dispatches — particularly examples with a few years and miles on them — is a stretched or seized bonnet release cable. If the interior lever feels loose, floppy, or comes all the way out with no resistance, the cable has likely snapped or come adrift from the latch mechanism. In that case you'll usually need to release the latch manually from the front by reaching through the grille with a long screwdriver or hooked tool, which is a job best handled by a workshop if you're not confident.
Another frequent issue is a frozen latch in winter. Water can sit in the mechanism and freeze it solid, meaning the lever pulls but nothing releases. A little warm (not boiling) water poured over the latch area, or de-icer sprayed into the mechanism, usually frees things up. Once the bonnet is open, spray the latch and cable ends with a light lubricant like WD-40 or GT85 to stop it happening again.
If the bonnet pops the primary catch but you can't find the secondary release, double-check you're feeling for it in the very centre of the leading edge — many first-time Dispatch owners search too far to one side. And if the safety catch itself feels sticky, a squirt of lubricant on the pivot point will usually sort it.
What to check under the bonnet on a Citroen Dispatch
Once the bonnet is safely up, it's worth taking a moment to check the essentials — especially if you're a working driver clocking up big weekly mileages. The engine oil dipstick is normally yellow and sits towards the front of the engine; check the level with the van parked level and the engine cold. The coolant expansion tank is a translucent plastic bottle with minimum and maximum markings on the side, and the screenwash reservoir cap is marked with a windscreen icon.
You should also cast an eye over the auxiliary drive belt for any obvious cracks or fraying, check the brake fluid reservoir level, and look for any signs of oil or coolant leaks around the engine and hoses. On the 1.6 and 2.0 HDi/BlueHDi diesels fitted to most Dispatches, keeping on top of oil level is particularly important — these engines don't like being run low.
Thinking of upgrading your Citroen Dispatch?
If you're checking under the bonnet more often than you'd like, or the running costs are creeping up as the miles rack up, it might be time to think about a newer van. The current Citroen Dispatch is one of the best mid-size panel vans on the market, with strong payload figures, car-like cab comfort, and efficient BlueHDi diesel or fully-electric ë-Dispatch drivetrains to choose from. Used examples hold their value well and there's a healthy stock of low-mileage vans available across the UK. Whether you're sticking with the Dispatch or considering a switch to another mid-size van, it's worth speaking to a specialist van dealer who can talk you through the options, part-exchange your current vehicle, and set up finance to suit your business.
FAQs
How do you open the bonnet on a Citroen Dispatch?
Pull the bonnet release lever in the driver's footwell to release the primary latch, then walk to the front of the van and slide your fingers under the centre of the bonnet's leading edge to find the secondary safety catch. Push the catch sideways while lifting the bonnet, then either let the gas struts hold it up (on newer models) or secure the prop rod into the underside of the bonnet on older models.
Where is the bonnet release lever on a Citroen Dispatch?
It's located inside the cab in the driver's side footwell, low down near the door sill. Look for a small plastic pull-handle or lever marked with a bonnet icon, typically to the right of the pedals on right-hand-drive UK vans.
Why won't my Citroen Dispatch bonnet open when I pull the lever?
The most likely cause is a stretched or broken bonnet release cable, which is a common fault on older Dispatches. If the lever feels loose or offers no resistance, the cable has probably failed and the latch will need to be released manually from the front — usually a workshop job. In winter, a frozen latch can also cause the same symptoms, in which case warm water or de-icer will usually free it off.
Is there a secondary safety catch on the Citroen Dispatch bonnet?
Yes. Once the interior lever releases the primary latch, the bonnet will only pop up an inch or so. You then need to reach under the centre of the leading edge and release the secondary safety catch by pushing it sideways (usually to the left) while lifting the bonnet.
Does the Citroen Dispatch bonnet have gas struts or a prop rod?
It depends on the model. The current third-generation Dispatch (2016 onwards) uses gas struts that hold the bonnet up automatically. Earlier Mk1 and Mk2 Dispatches use a manual prop rod that clips to the slam panel or inner wing and needs to be slotted into a hole on the underside of the bonnet.