Where Is the Citroen Relay Battery? Location & Access Guide
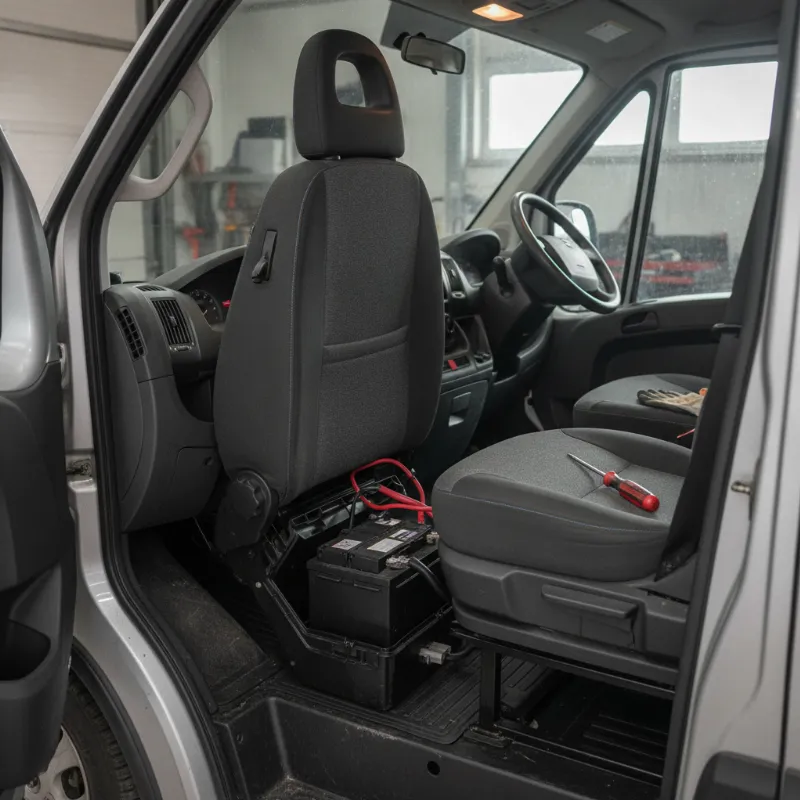
Where is the battery located on a Citroen Relay?
If you've popped the bonnet on your Citroen Relay expecting to find the battery sitting on top of the engine, you're not alone in being surprised. Unlike many vans and cars, the Relay hides its main starter battery somewhere far less obvious — a design choice Citroen has stuck with across most generations of this popular large panel van.
Knowing where to look before you start troubleshooting a flat battery, jump-starting the van or fitting a replacement will save you a lot of frustration, especially on a cold morning when the Relay refuses to turn over.
Under the driver's seat: the standard location
On the vast majority of Citroen Relay vans, the battery is located underneath the driver's seat. This applies to the second and third generation Relay (also known as the Jumper in some markets, and shared with the Peugeot Boxer and Fiat Ducato). Citroen chose this position to free up engine bay space, improve weight distribution and keep the terminals away from engine heat and vibration.
You'll find the battery sitting in a plastic tray beneath a lift-out cover, secured by a clamp bar. There are usually remote positive and negative jump-start posts under the bonnet as well, so you don't always need to lift the seat just to give the van a boost from another vehicle.
How to access the Citroen Relay battery step by step
To get to the battery, start by sliding the driver's seat all the way back on its runners to give yourself room to work. Next, look for the plastic access panel on the front of the seat base — it's typically held in place by a couple of clips or turn-fasteners. Release these and lift the panel away.
With the panel removed you'll see the battery cover, which usually just pulls upward once you've unclipped it. Underneath sits the battery itself, with the positive terminal covered by a red plastic cap. Take a moment to check for any signs of corrosion, moisture or a loose clamp before you start working on the terminals.
Tools you'll need before you start
You don't need a workshop full of kit to check or change a Relay battery, but a few basic tools will make the job far easier and safer. A 10mm and 13mm spanner or socket set will cover the terminal nuts and the clamp bar on most model years. A ratchet with a short extension is handy because space around the seat base is tight.
It's also worth having a pair of insulated gloves, some safety glasses, a wire brush or terminal cleaner for tidying up any corrosion, and a memory saver or OBD-port power supply if you want to keep the radio, clock and stored settings alive during the swap. A torch is essential — the under-seat compartment isn't well lit, particularly in winter.
Checking and replacing the Citroen Relay battery safely
Before you touch anything, turn the ignition fully off, remove the key (or key fob from the cabin on keyless versions) and make sure lights, wipers and the heater blower are all switched off. If the battery has been struggling, a quick voltage test with a multimeter across the terminals will tell you a lot: a healthy resting voltage sits around 12.6V, while anything below 12.2V suggests the battery is significantly discharged.
When lifting the old battery out, remember these are heavy — often 20kg or more on a diesel Relay — so lift with your knees and be mindful of the seat frame above you.
Disconnecting the terminals in the correct order
Always disconnect the negative terminal first. This is the black cable, usually marked with a minus symbol. Loosen the clamp nut, wiggle the terminal free and tuck the cable to one side so it can't spring back onto the post. Only then should you disconnect the positive (red, plus symbol) terminal.
When fitting the new battery, reverse the order: positive on first, then negative. Doing it this way minimises the risk of a short circuit if your spanner accidentally touches bodywork while the other terminal is still live. Tighten the clamps firmly but don't overdo it — the lead posts are soft and can distort.
Common issues with the battery tray and cables
Because the battery lives under the driver's seat, it's not unusual to find the tray damp from condensation, spilled drinks or water tracking down from the door seal. Over time this can cause the metal clamp bar to rust and the earth strap to corrode where it bolts to the body. Give both a good clean and treat any surface rust before dropping the new battery in.
Cable ends are another common weak point. If you see green or white powdery deposits on the terminals, clean them back to bright metal and apply a smear of petroleum jelly or proper battery terminal grease. A poor connection here can mimic the symptoms of a failing battery — slow cranking, dashboard warning lights and intermittent electrical gremlins.
Does battery location differ by model year or wheelbase?
For the Relay generations most owners are working on today — the X250 launched in 2006 and the facelifted X290 from 2014 onwards — the under-seat location is standard regardless of trim or engine. Very early first-generation Relays (pre-2002) placed the battery in the engine bay, but you're unlikely to encounter one of those still in regular working use.
L2H2, L3H2 and long wheel base variants
Wheelbase and roof height don't change where the battery sits. Whether you've got a short wheelbase L1H1 crew van, a medium L2H2, a long L3H2 panel van or the extra-long L4 with a high roof, the battery is still tucked under the driver's seat. The same goes for chassis cab, dropside and Luton conversions built on the Relay platform — the base vehicle wiring is identical, so the location doesn't move.
Some motorhome and camper conversions based on the Relay add a leisure battery elsewhere (often under a bench seat or in a rear locker), but that's a secondary battery for habitation use and is separate from the vehicle's starter battery under the driver's seat.
When to replace vs recharge your Relay battery
Not every flat battery needs replacing. If your Relay has been standing for a few weeks, or you've been doing lots of short stop-start deliveries without a proper run, the battery may simply be undercharged. A decent smart charger left on overnight will often bring it back to full health, and it's much cheaper than fitting a new one.
That said, batteries don't last forever. Most Relay starter batteries give three to five years of reliable service, and heavy commercial use with lots of engine-off electrical load (tail lifts, refrigeration, inverters) shortens that considerably. If the battery won't hold a charge, drops voltage rapidly under load, or shows physical signs of swelling or leaking, replacement is the safer option. Match the replacement to the original specification — capacity in Ah, cold cranking amps and case size all matter, and vans fitted with stop-start need an AGM or EFB type rather than a standard flooded battery.
Looking for a newer Citroen Relay van?
If your current Relay is on its third battery and starting to feel its age elsewhere, it might be time to think about an upgrade. Newer Relays benefit from improved electrical management, better insulation around the battery compartment and, on the latest models, the option of a fully electric e-Relay drivetrain that removes the traditional starter battery worries altogether.
Whether you're after a low-mileage used panel van or a nearly-new example with manufacturer warranty still in place, it's worth comparing what's available before committing to another round of repairs. Get in touch with our sales team to talk through the options, arrange a viewing or line up a test drive at a time that suits your working week.
FAQs
Where is the battery located on a Citroen Relay van?
On virtually all modern Citroen Relay vans (2006 onwards, both X250 and X290 generations), the starter battery is located underneath the driver's seat. You access it by sliding the seat back, unclipping the plastic panel on the front of the seat base and lifting off the battery cover. There are also remote jump-start terminals under the bonnet for convenience.
Can I jump-start a Citroen Relay without lifting the driver's seat?
Yes. Citroen fitted remote positive and negative jump-start posts in the engine bay for exactly this reason. Lift the bonnet and look for a red plastic cover marked with a plus symbol on or near the fuse box for the positive post, and a designated earth point (often a bare metal stud) for the negative connection. This lets you jump-start the van without disturbing the seat or the main battery.
How long does a Citroen Relay battery typically last?
A standard Relay starter battery usually lasts between three and five years in normal use. Heavy commercial duty — lots of short trips, tail lifts, refrigeration units or inverters running with the engine off — will shorten that lifespan. Regular long drives, keeping terminals clean and using a smart charger during long lay-ups will all help you get the maximum life out of it.
Do I need to reset anything after changing the Relay battery?
After a battery change you may need to reset the clock, re-enter the radio code (on some older models), and reprogramme the electric windows by holding the switch in the fully up position for a few seconds. The engine management system will also relearn idle settings over the first few miles. Using a memory saver plugged into the OBD port during the swap avoids most of this hassle.
What size battery does a Citroen Relay need?
Most diesel Relays use a large commercial-spec battery, typically in the 90–110Ah range with cold cranking amps of around 720–800A. Vans equipped with stop-start technology require an AGM or EFB battery rather than a standard flooded type. Always check the label on your existing battery or your handbook for the exact specification before ordering a replacement.