How to Remove a Citroen Relay Gearbox: A Step-by-Step Guide
Before you start: is a gearbox removal really necessary?
Pulling the gearbox out of a Citroen Relay is a big job, and before you commit a weekend (or more) to it, it's worth being sure the box itself is actually the problem. The Relay shares its ML5T/ML6C transmission platform with the Peugeot Boxer and Fiat Ducato, and while these units are generally robust, they can suffer from bearing wear, synchro issues and clutch-related complaints that often get misdiagnosed as terminal gearbox failure. A little time spent on diagnosis now can save you a huge amount of work later.
Think of gearbox removal as a last resort after simpler checks have been exhausted. If you're a competent home mechanic with a solid workshop set-up, it's absolutely achievable, but you need a clear picture of what you're chasing before the van goes up on axle stands.
Common symptoms that point to gearbox work
Classic signs that the gearbox itself needs attention include a whine or growl that changes with road speed rather than engine speed, jumping out of gear (particularly 5th or 6th under load), crunching between specific gears even with a healthy clutch, and difficulty selecting reverse. Oil leaking from the bellhousing or the input shaft seal is another strong indicator, as is a persistent bearing rumble that goes quiet when the clutch pedal is pressed.
On the other hand, symptoms like a heavy, sticky clutch pedal, a bite point that has crept to the top of the pedal travel, or juddering when pulling away often point at the clutch and dual mass flywheel rather than the gearbox internals — although of course you still have to drop the box to fix those too.
Checks to do first (clutch, linkage, gearbox oil)
Before anything comes apart, do a proper walk-around of the drivetrain. Check the gear linkage cables where they enter the top of the gearbox — the plastic ball joints are a well-known Relay weakness and worn cables mimic internal gearbox faults surprisingly well. Inspect the clutch hydraulic circuit for leaks at the master cylinder, slave cylinder and concentric release bearing (where fitted).
Drop a small sample of gearbox oil and look for metallic glitter or a burnt smell — either is a bad sign. Confirm the oil level is correct, because a low-oil whine can be misread as bearing failure. Finally, get the van scanned for stored codes; a slipping clutch or misfire can throw up symptoms that feel gearbox-related from the driver's seat.
Tools, safety kit and workshop setup
The Citroen Relay is a heavy front-wheel-drive van and its gearbox lives in an awkward spot low on the nearside of the engine bay. You cannot do this job safely on a trolley jack and a couple of bricks — proper equipment isn't optional here, it's what keeps you alive underneath two-and-a-half tonnes of Euro panel van.
Essential tools and torque specs
At a minimum you'll need a full metric socket set including deep sockets, a good quality 1/2" breaker bar, Torx and E-Torx sockets (the bellhousing bolts are typically E-Torx), a calibrated torque wrench that covers both low and high ranges, and a transmission jack or gearbox cradle. A slide hammer is very useful for driveshaft removal, and you should have a set of ratchet straps to secure the engine once the box is out.
Consult a workshop manual for the specific torque values on your engine variant — bellhousing bolts, driveshaft nuts, subframe bolts and engine mount fasteners all have defined torques and, in many cases, angle-tighten stages. Never guess these; a loose bellhousing bolt or an over-tightened driveshaft nut will cause you grief further down the line.
Safely lifting and supporting the Citroen Relay van
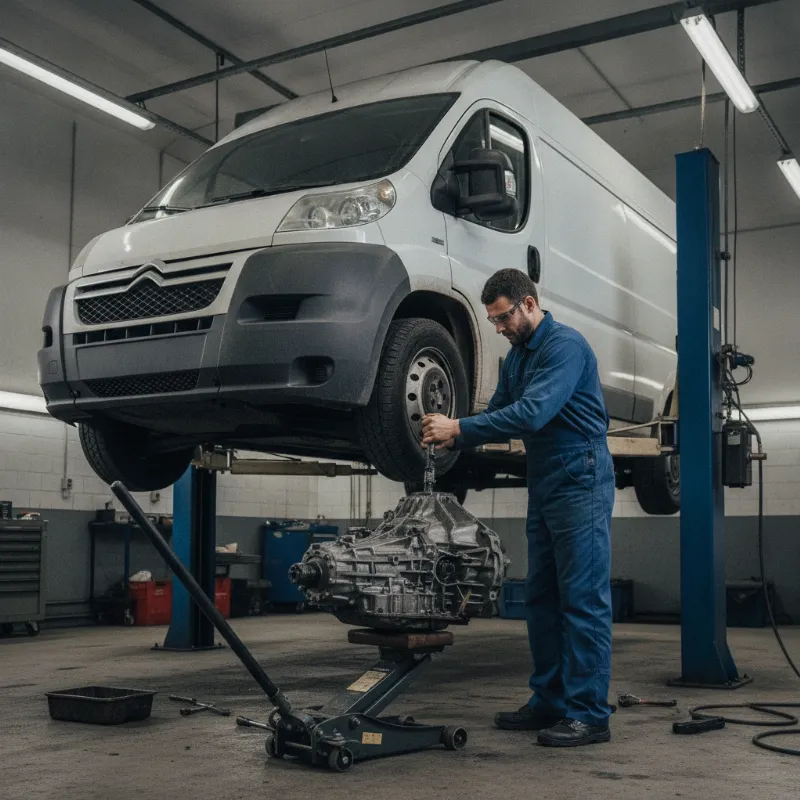
A two-post ramp is by far the best way to tackle this, giving you the working height and access underneath that the job really demands. If you're working on the ground, you need four rated axle stands placed on the manufacturer's designated lifting points, wheel chocks on any wheel still touching the floor, and enough height to slide the gearbox out from underneath — bear in mind the Relay's transmission is a chunky unit.
Support the engine from above with an engine support bar spanning the inner wings, or from below on a padded jack once the box is ready to come out. Never rely on a single hydraulic jack as your only means of support, and always double-check your stands are square and locked before going underneath.
Step-by-step: how to remove the Citroen Relay gearbox
With diagnosis done, tools laid out and the van properly supported, the removal itself follows a logical sequence. Work methodically, bag and label every bolt as it comes out, and take photos as you go — modern vans have a lot of connectors and brackets, and remembering where everything lives three days later is harder than you'd think.
Disconnecting the battery and electrical connectors
Start by disconnecting the negative battery terminal and leaving it isolated for at least ten minutes to allow any capacitors to discharge. Remove the battery and battery tray if access to the top of the gearbox is restricted — on most Relay variants you'll need the tray out to reach the upper bellhousing bolts and the reversing light switch connector.
Unclip the wiring loom from the top of the transmission, disconnect the reversing light switch, the speed sensor (if fitted separately) and any earth straps bolted to the bellhousing. Move the loom clear and tuck it up out of the way so you don't snag it later.
Removing driveshafts, linkage and starter motor
Raise the van, remove both front wheels and slacken the driveshaft nuts (these are usually done up very tight, so break them with the wheels on the ground if you can). Undo the lower ball joints or the hub carrier bolts as your workshop manual specifies, then pop the driveshafts out of the gearbox — expect some oil loss and have a drain tray ready. Cap the openings to keep dirt out.
Disconnect the two gear linkage cables from their pivots on top of the box, unclip them from the retaining bracket and swing them clear. Unbolt the starter motor and manoeuvre it out — it's easier to remove now than to fight with once the gearbox is hanging on the jack. Drain the gearbox oil at this stage if you haven't already.
Supporting the engine and unbolting the bellhousing
Fit your engine support bar across the top of the engine bay and take up the weight of the engine. Unbolt the nearside engine mount and gearbox mount entirely so the powertrain can tilt slightly when needed. Position your transmission jack under the gearbox, snug it up to the sump face of the box, and strap the gearbox to the jack — do not skip this step.
Now work your way around the bellhousing bolts, loosening in a cross pattern to keep the joint square. Leave two bolts in place — one high, one low — as your last-out fasteners while you make a final check that nothing is still attached: clutch slave line, earth straps, brackets, wiring. When you're satisfied, remove the last two bolts.
Lowering the gearbox clear of the vehicle
Ease the gearbox straight back from the engine, keeping the input shaft aligned with the clutch friction plate — any sideways load here will bend the shaft or damage the clutch. Once the input shaft is clear of the clutch, you can tilt the box slightly to clear the subframe and body panels, then lower the jack steadily.
Take your time on the way down. There's very little room between the gearbox and the front subframe, and it's easy to catch a sensor, a breather or a wiring clip on the way out. Once it's on the floor, transfer it to a bench for inspection or send it away for repair.
Refitting tips and things people get wrong
The number one mistake on refitting is forcing the gearbox onto the engine when the input shaft splines aren't aligned with the clutch centre. If the box won't sit flush with the block by hand pressure, stop — do not use the bellhousing bolts to pull it home. Turn the crank slightly to align the splines, or gently rock the box until it slides on. Pulling it up on the bolts warps the bellhousing and cracks ears clean off.
Other common pitfalls include forgetting to refill the gearbox with the correct oil (Total Transmission BV or an equivalent MTF is typically specified — check your handbook), reusing stretch-to-yield driveshaft nuts, and not greasing the input shaft splines lightly on assembly. Bleed the clutch hydraulic system thoroughly before the first road test, and reset any adaptations with a diagnostic tool if the clutch or transmission is a new unit.
When to hand it to a specialist
Be honest with yourself about the job. If you don't have a ramp or a transmission jack, if you can't source the correct torque figures, or if the diagnosis is uncertain, a Citroen or LCV specialist will do this quicker and with less risk of collateral damage. Dual mass flywheel replacement, clutch renewal and gearbox rebuilds are also areas where specialist tools (flywheel locking pins, bearing pullers) make a real difference to the finished job.
It's also worth getting a professional opinion if the van is still under warranty, if it's a fleet vehicle where downtime is expensive, or if the gearbox turns out to need internal repair — rebuilding a manual box is a precision task that really belongs on a specialist's bench. There's no shame in dropping it off; a good workshop will have seen the same job dozens of times and priced it accordingly.
Frequently asked questions
Below are some of the questions Relay owners most often ask before tackling this job themselves.
FAQs
What are the steps to safely remove the gearbox from a Citroen Relay van?
In short: disconnect the battery and remove the battery tray for access, unplug wiring from the top of the gearbox, drain the gearbox oil, remove both driveshafts, disconnect the gear linkage cables and unbolt the starter motor. Then support the engine from above, take the weight of the gearbox on a proper transmission jack, remove the gearbox mount and unbolt the bellhousing in a cross pattern. Ease the box straight back off the input shaft, tilt it clear of the subframe and lower it down. Throughout, work on a ramp or on rated axle stands, strap the gearbox to the jack and never pull the box onto the engine using the bellhousing bolts on refit.
How long does it take to remove a Citroen Relay gearbox?
For an experienced technician on a two-post ramp, removal alone is typically a half-day job, with refit and clutch work extending it to a full day or more. If you're working on the ground at home with basic tools, realistically set aside a full weekend and be prepared for it to take longer if bolts are seized or brackets need extra persuasion.
Do I need to remove the subframe to drop the gearbox on a Citroen Relay?
On most Relay variants you don't need to drop the full subframe, but you will need to unbolt the nearside engine/gearbox mount and disconnect the driveshafts from the hub carriers to gain enough clearance. Some later models with tighter engine bays benefit from lowering the subframe slightly to ease the box past — check a model-specific workshop manual for your exact van.
Should I replace the clutch while the gearbox is out?
Almost always, yes. The vast majority of the labour in a clutch job is the gearbox removal itself, so if the clutch has any significant mileage on it, it makes sense to fit a new clutch kit — and inspect the dual mass flywheel — while access is easy. It's a false economy to refit an old clutch and have to repeat the whole job a year later.
What oil does a Citroen Relay gearbox take and how much?
Most Relay manual gearboxes use a Total Transmission BV 75W-80 or an equivalent manufacturer-approved MTF, with a typical capacity of around 2 litres — though this varies by gearbox code (ML5T, ML6C, etc.). Always confirm the specification and quantity against your VIN before refilling, and fill through the correct level plug rather than guessing by volume.